Setting up a server node
June 28, 2020
The following is something that I wrote as part of our internal documentation for our lab, but I decided to share it here because I’ve discussed some neat tools like Environment Modules and Prometheus among others that I think more people will find useful. Another reason is because I haven’t posted anything in a while (hashtag content). And just to be clear, the hostnames and IPs referenced here will be unreachable as they are internal to our network.
This document details the process involved in setting up a new compute node, and adding it to the RRC compute cluster. This can be used as reference for sysadmins and users who want to understand how things are setup.
We assume that all the required hardware is properly installed and discuss only the software setup. We begin with a fresh installation of Ubuntu server 18.04.4 LTS.
Basic working environment
We begin by logging in as the root user. Root login using password is disabled by default, and only works with key-based authentication. So we need to place our public SSH key at /root/.ssh/authorized_keys on the server node beforehand. Once inside the root environment, we begin by installing our favourite cli tools:
apt update
apt install vim tmux htop iotop nload sysstat git python-pip python3-pip zsh corkscrew
We then set zsh to be our default shell, and install prezto as our zsh manager. We also setup the network proxy environment variables, to avoid using transparent proxy. To do all this we run the following script:
curl -L https://researchweb.iiit.ac.in/~srisai.poonganam/setup/shell-setup.zsh | zsh -
As part of the shell setup we also add the following lines to the system-wide /etc/bash.bashrc file.
# Force logout idle sessions
if [[ -n $SSH_CONNECTION ]] ; then
        # Close idle user session after 2 hours
        export TMOUT=7200
fi

# Query and show home quota usage from black (data server)
echo ""
curl -s black.iiit.ac.in:8080/$USER 2> /dev/null
echo ""
Home directories mount
All the home directories of our users are stored centrally on the black server, under the /mnt/rrc/home directory. This directory comes with data guarantees, and is where we expect users to store their code, models, and any other data that they want to persist. This directory is exported by black to all the compute nodes using NFS.
To allow our node to access this export, we add the following line (with the node IP) to the /etc/exports file on black:
/mnt/rrc/home 10.4.18.9(rw,async,no_root_squash,no_subtree_check)
We then make sure the new contents are read by the NFS daemon on black by running exportfs -a.
On our node (client side), we run the following commands to manually mount the exported home directories:
apt install nfs-common
mount -v -t nfs 10.4.18.3:/mnt/rrc/home /home
To enable automatic mounting (on boot), we add the following line to /etc/fstab:
10.4.18.3:/mnt/rrc/home /home nfs rw,soft,intr 0 0
At this point the local /home directory on our node should contain all the user directories fetched from black. This centralised setup allows users to easily move between different nodes, and allows us to manage daily backups and quotas from a single location. But since this is mounted over the network, there will be latency and so we expect users to use this directory only as a cold long-term storage. For local operations we setup a scratch drive.
Scratch space mount
Each compute node has attached to it a 1 TB SSD drive (sometimes 2 SSDs configured as a RAID0 drive) meant as low-latency storage for users to work with locally for their I/O operations. To mount this drive, we run the following commands (with the right device file name):
mkdir /scratch
mount /dev/sdb1 /scratch
In addition, as done for the home space mount, we add the following line to /etc/fstab (run blkid to identify the right UUID):
/dev/disk/by-uuid/b63e7654-3442-4eb7-98d4-25e78618d235 /scratch ext4 defaults 0 0
Since this is a drive shared by all the users connected to the node, we setup quota to prevent any user from occupying too much space that would restrict other users. To enable quota for /scratch, we first modify the /etc/fstab file with the usrquota option as follows:
/dev/disk/by-uuid/b63e7654-3442-4eb7-98d4-25e78618d235 /scratch ext4 defaults,usrquota 0 0
Then we remount the drive and create the quota index and quota files using the following commands:
apt install quota
mount -o remount /scratch
quotacheck -cum /scratch
quotaon /scratch
Though quota is enabled for the drive now, we allocate quotas for the users only when the disk usage exceeds a certain threshold. This is explained in the Custom Scripts section.
Software packages
Apart from the basic CLI tools already installed in the first step, we try not to install anything using apt install. Installing any package often brings with it its own version of system dependencies which can silently break someone else’s workflow. These dependencies can also get auto-updated during OS upgrades (if enabled). So we expect users to build any packages that they need locally by themselves, or install from conda-forge if available. That said, we build some commonly used packages from source by ourselves and install them to /opt/. This includes CUDA & cuDNN, Singularity, gcc, and Matlab. However we don’t always need to build all these tools. Most of these are statically built, so we can just copy all their files from the /opt directory of another compute node onto this node and things will work just fine.
Environment Modules
We often need to build and manage different versions of the same tool (eg: CUDA), as users work on different projects and have different requirements. The hard way to manage them is to manually change one’s PATH variable to point to the right version of the tool each time. The easier way is to use the Environment Modules package. Modules provides a clean interface for dynamically modifying one’s environment variables using modulefiles. This allows easy loading of different versions of a tool or library without having to manually change the PATH variable each time. To install Modules we run the following commands:
apt install automake autopoint tclsh tcl8.6-dev
mkdir -p /opt/Modules/modulefiles
./configure --prefix=/opt/Modules \
	--modulefilesdir=/opt/Modules/modulefiles
make && make install
Then we add the following lines to /etc/bash.bashrc and /etc/zsh/zshrc , respectively, to make Modules available at shell startup:
source /opt/Modules/init/bash
source /opt/Modules/init/zsh
Finally, we add modulefiles for all the tools that we want to make available as ‘modules’ into the /opt/Modules/modulefiles directory. The following is an example modulefile for CUDA 10.2, saved as /opt/Modules/modulefiles/10.2.
#%Module1.0
##
## CUDA Modulefile
##
proc ModulesHelp { } {
    global version

    puts stderr "\n\tThis module adds CUDA-10.2 to your environment variable"
    puts stderr "\tDirectory: $root"
}

module-whatis   "adds CUDA-10.2 to your environment variable"

set           version          10.2
set           app              CUDA
set           root             /opt/cuda/10.2
prepend-path   PATH             $root/bin
prepend-path   LD_LIBRARY_PATH  $root/lib64
With this file added, CUDA 10.2 can be loaded dynamically using module load cuda/10.2. These modulefiles can be directly copied from any other node.
Hostname
Before we be begin connecting our node to other services, we fix the hostname. Our convention is to name a node after any uniquely identifiable color on its hardware (such imagination). We name this node blue. To fix this, we add an A record on our Cloudflare DNS, to point the IP address of the node to blue. The full hostname would be blue.rrcx.ml, where rrcx.ml is our domain managed on Cloudflare. We have another domain rrc.iiit.ac.in which resides on the IIIT nameservers. We don’t have direct control on this domain, but it is already made to point to rrcx.ml using a DNAME record. So, blue.rrc.iiit.ac.in is another valid hostname for this node and is what we expect most users to use. If needed, we can also request the university server room to add another CNAME record to point this to blue.iiit.ac.in.
Custom scripts
At this point we start cloning some of our maintenance scripts from our Github repo. The repository contains many maintenance scripts, but the ones relevant for this compute node are,
-clear-storage.sh: Deletes files in the /scratch directory that haven’t been accessed in two weeks. The respective owners are also sent a notification one day before.
-quota-bot.sh: Checks the usage of /scratch directory and if it is greater than 85% of capacity, a limit of 375 GB is set for every user whose usage is greater than 150 GB.
-daily-mails.sh: Reports files in /tmp that are not owned by root.
We use SSH to connect to our Github repositories. We have a bot account, named rrc-iith, that has access to all the repositories on our RoboticsIIITH organization page. We generate public and private keys for our node using the following command and add the public key to the bot account on Github for access to all the repositories from this node.
ssh-keygen -o -a 100 -t ed25519 -f ~/.ssh/id_ed25519
SSH connections to Github (or any external server) however are blocked within the IIIT network. Fortunately, Github supports SSH connections over the HTTPS port to the ssh.github.com server. To force all connections to Github to run through this server and port, we add the following lines to the ~/.ssh/config file:
Host github.com
	User rrc-iiith
	Port 443
	Hostname ssh.github.com
	TCPKeepAlive yes
	IdentitiesOnly yes
	ProxyCommand corkscrew proxy.iiit.ac.in 8080 %h %p
Further, we modify our ‘/root/.gitconfig’ to identify the hostname as follows:
git config --global user.name 'rrc-bot' user.email '[email protected]'
Once the connection is setup we clone our sysad-scripts repository from our Github page onto the root directory /root/sysad-scripts. We also create another directory scripts as a symlink to this. We then create a crontab (crontab.blue) to automatically run these scripts at certain times as well as pull updates, if any, from the repo.
0 */3 * * * root cd /root/sysad-scripts && /usr/bin/git pull > /dev/null # runs every three hours
0 3 * * * root /root/scripts/clear-storage/clear-storage.sh # runs at 3 AM every day
0 0 * * * root /root/scripts/daily-mails.sh
0 * * * * root /root/scripts/quota-bot.sh
This is then symlinked to /etc/cron.d/sysad-scripts where it’s picked up by cron and run accordingly.
Monitoring tools
We use Prometheus for system health monitoring. Prometheus is running on the server at 10.4.18.8:9090, and it scrapes and stores time-series data using metrics exposed by the OS. We use node_exporter for exposing OS and CPU related metrics to Prometheus, and nvidia_gpu_prometheus_exporter for GPU related metrics. Both of these are static binaries which can directly be copied from another compute node to /opt/metrics/. We also copy the respective service files to /etc/systems/system/metrics-exporter.service and /etc/systemd/system/gpu-metrics.exporter.service. Then we run the following commands,
systemctl start metrics-exporter.service
systemctl start gpu-metrics.exporter.service
At this point the exporters would now be exposing the metrics for Prometheus. To verify, we run the following commands:
curl http://blue.iiit.ac.in:9100/metrics
curl http://blue.iiit.ac.in:9445/metrics
Then, to access these metrics on the Prometheus server, we edit the file /opt/prometheus/prometheus.yml to include the following:
- targets: ['blue.iiit.ac.in:9100']
      labels:
        group: 'compute_nodes'
        hostname: blue.rrc.iiit.ac.in
        app: node_exporter

- targets: ['blue.iiit.ac.in:9445']
      labels:
        group: 'gpu_nodes'
        hostname: blue.rrc.iiit.ac.in
        app: nvidia_gpu_prometheus_exporter
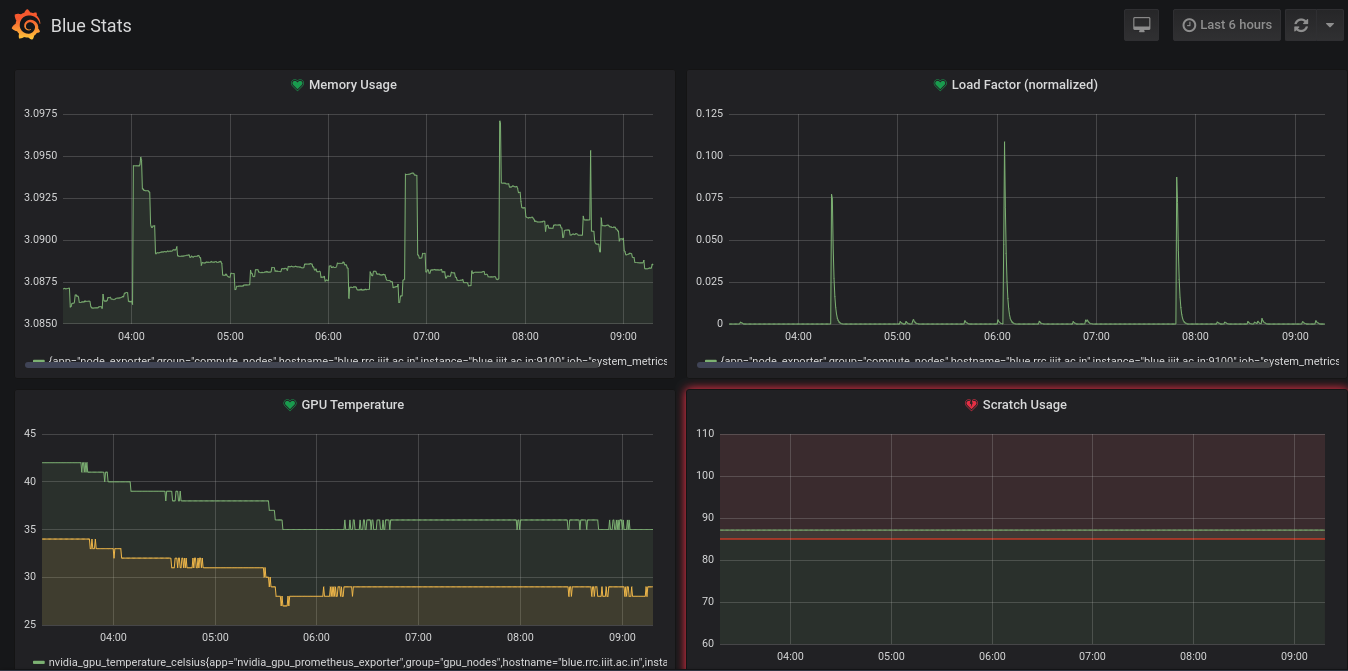
Finally, we run systemctl restart prometheus.service to start scraping the data. We use Grafana for visualizing the scraped metrics from Prometheus, and creating alerts. Grafana is setup on the same server as Prometheus and is available at monitor.rrc.iiit.ac.in. A new dashboard with panels, and alert rules need to be created for this node. These can be directly copied from the dashboard of another node and are not discussed here.
/etc backup
The /etc directory contains many important system configuration files that need to be kept track of. We use etckeeper to keep track of these files. It stores all the files inside a git repository and automatically commits any changes made to these files. It can also push these changes to a remote repository for backups. The setup is simple:
apt install etckeeper
cd /etc
etckeeper init
To sync it to a remote repository, we create a private repository (blue-etckeeper) on the RoboticsIIITH organization page and give administrative access to the SysAds team. Then we run git remote add origin [email protected]:RoboticsIIITH/blue-etckeeper.git inside the /etc folder, and edit the PUSH_REMOTE option in /etc/etckeeper/etckeeper.conf with the name of the remote - origin. The SSH config for Github needs to be properly setup for this to work, as described earlier.
Disable auto-upgrades
The apt package manager periodically updates the package lists to . However, we never intend to install any of these updates as they can easily break someone’s workflow. So to disable this we set APT::Periodic::Update-Package-Lists to 0 in the file /etc/apt/apt.conf.d/20-autoupgrades.
Moreover, apt also tends to automatically apply any critical security updates. But most of these are updates at the kernel level which require a reboot, so we decided not to install any of these security updates too (!). To disable this we set APT:Periodic::Unattended-Upgrade to 0 in the same file.
IPA enrolment
We use a FreeIPA server for user and host identity management, and authentication. To enrol this node as a host to the IPA server we run the following commands:
apt install freeipa-client
ipa-client-install -v \
	--mkhomedir \
	--ntp-server=time.iiit.ac.in \
	--fixed-primary \
	--hostname=blue.rrc.iiit.ac.in
Running this installer will require admin IPA credentials, and assumes that the host SSH keys have already been created. Our IPA server is running at [ipa.rrc.iiit.ac.in](http://ipa.rrc.iiit.ac.in) and the installer will find it by default by using the domain name rrc.iiit.ac.in that is parent to the hostname. The --mkhomedir is used to configure the host to create a user’s home directory upon login if it does not exist yet. The --fixed-primary option specifies that the host will use this server as a fixed server even during failures and will not attempt to fallback to a different server.
Once the node is enrolled as a host, it should appear under the Identity→Hosts tab (use the web ui of the IPA server).
Firewall
As a final step before we enable user access, we setup a basic firewall for the node. We use iptables for this. iptables applies chains of rules to incoming network packets to determine what to do with matching packets. We first run the following commands to setup our table,
# flush existing rules
iptables -F INPUT
iptables -F FORWARD
iptables -F OUTPUT

# default targets
iptables -P INPUT ACCEPT
iptables -P FORWARD DROP
iptables -P OUTPUT ACCEPT
Next, we specify which ports to accept connections from.
iptables -A INPUT -p tcp -m tcp --dport 80 -j ACCEPT #http
iptables -A INPUT -p tcp -m tcp --dport 443 -j ACCEPT #https
iptables -A INPUT -p tcp -m state --state NEW -m tcp --dport 22 -j ACCEPT #ssh
iptables -A INPUT -p tcp -m tcp --dport 3389 -j ACCEPT #rdp
iptables -A INPUT -p tcp -m tcp --dport 9445 -j ACCEPT #node_exporter
iptables -A INPUT -p tcp -m tcp --dport 9100 -j ACCEPT #gpu_node_exporter
Finally, we add known source IPs and reject everything else.
iptables -A INPUT -s 10.4.18.2/32 -j ACCEPT #green
iptables -A INPUT -s 10.4.18.3/32 -j ACCEPT #black
iptables -A INPUT -s 10.4.18.4/32 -j ACCEPT #neon
iptables -A INPUT -p icmp -j ACCEPT
iptables -A INPUT -s 127.0.0.0/8 -j ACCEPT
iptables -A INPUT -s 10.4.18.7/32 -p tcp -m state --state NEW -m tcp --dport 5666 -j ACCEPT #not sure?
iptables -A INPUT -m state --state RELATED,ESTABLISHED -j ACCEPT
iptables -A INPUT -j REJECT --reject-with icmp-port-unreachable
Run iptables -L -v to ensure if it is setup as expected.
Enable user access
Finally, to enable users (also enrolled on the IPA server) to access this node, we create a new users group (eg: blue) under the Identity → Groups tab of web IPA, and add the users who’d like to have access to this node to this group.
Then we go to the Policy → Host-based Access Control tab and create a new rule (eg: access_blue). Here we specify the name of the users group and the hostname they will get access to, and the default services.
At this point the users should be able to login to the node and start running their programs.